
目次
タスク:ルートのレイアウトをLinearLayoutに変更する
このタスクでは、テンプレートによって自動作成されたルートのビューグループをLinearLayoutに変更します。またUI要素は垂直に並べて配置します。
ビューグループ
ビューグループとは子ビューを含むことができるビューです。子ビューとしてさらにビューグループが含まれることあります。レイアウトを構成しているビューはルートとなるビューグループにビューが含まれる形のヒエラルキーとして構成されています。
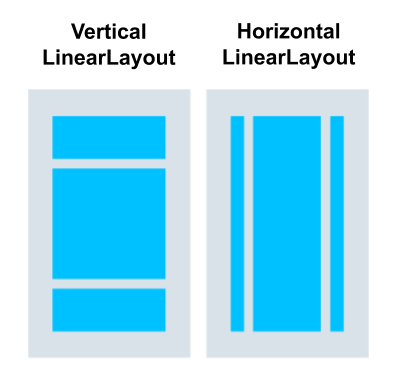
LinearLayoutビューグループの中のUI要素は水平(Horizontal)、または垂直(Vertical)方向に並んで配置されます。
ルートレイアウトをLinearLayoutビューグループを使用するように変更します。
- Project>Androidを選択し、app/res/layoutフォルダーの中のactivity_main.xmlファイルを開いてください。
- Textタブを選択して、ルートビューグループをConstraintLayoutからLinearLayoutに変更してください。
- TextViewを削除してください。LinearLayout要素の中にandroid:orientation属性を追加し、値をverticalにセットしてください。
変更前
<androidx.constraintlayout.widget.ConstraintLayout xmlns:android="http://schemas.android.com/apk/res/android"
   xmlns:app="http://schemas.android.com/apk/res-auto"
   xmlns:tools="http://schemas.android.com/tools"
   android:layout_width="match_parent"
   android:layout_height="match_parent"
   tools:context=".MainActivity">

   <TextView
       android:layout_width="wrap_content"
       android:layout_height="wrap_content"
       android:text="Hello World!"
       app:layout_constraintBottom_toBottomOf="parent"
       app:layout_constraintLeft_toLeftOf="parent"
       app:layout_constraintRight_toRightOf="parent"
       app:layout_constraintTop_toTopOf="parent" />

</androidx.constraintlayout.widget.ConstraintLayout>
変更後
<LinearLayout
       xmlns:android="http://schemas.android.com/apk/res/android"
       xmlns:tools="http://schemas.android.com/tools"
       xmlns:app="http://schemas.android.com/apk/res-auto"
       android:layout_width="match_parent"
       android:layout_height="match_parent"
       android:orientation="vertical"
       tools:context=".MainActivity">

</LinearLayout>

コメント